Views: 0 Author: Site Editor Publish Time: 2024-02-15 Origin: Site

If you have ever injured your thumb and needed a splint, you may have been surprised to learn that not all splints are made of rigid materials like metal or plaster. In fact, thermoplastic thumb splints have become increasingly popular due to their versatility and comfort. In this article, we will provide you with a step-by-step guide on how to make your own thermoplastic thumb splint, ensuring a perfect fit and maximum support. Additionally, we will discuss the importance of caring for and maintaining your splint to ensure its longevity and effectiveness. Whether you are a healthcare professional or an individual looking to create a customized solution for your thumb injury, this article will provide you with all the necessary information to create and care for a thermoplastic thumb splint.
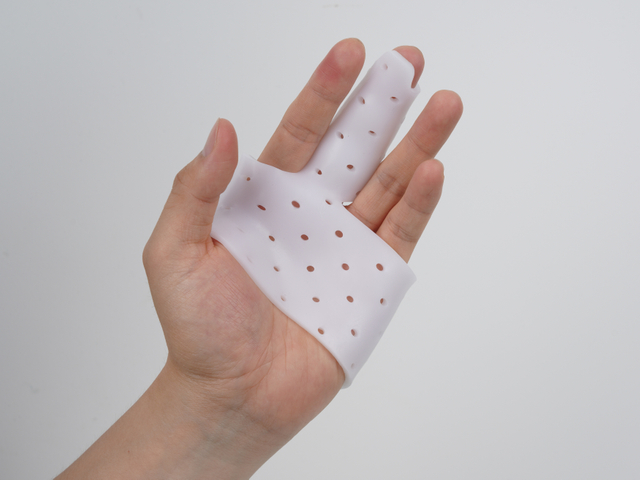
A thermoplastic thumb splint can be a useful tool in providing support and stability for individuals who have suffered thumb injuries or are experiencing thumb pain. Making a thermoplastic thumb splint might sound complicated, but with the right materials and a step-by-step guide, it can be a relatively simple process.
First, gather all the necessary materials. You will need a sheet of thermoplastic material, which can be easily molded when heated, a pair of scissors, a heat gun or hot water, and some padding material such as foam or cotton.
To start, measure the length and width of the patient's thumb to determine the size of the splint needed. It is important to ensure a proper fit to provide maximum support. Once you have the measurements, mark them on the thermoplastic sheet and use the scissors to cut out the desired shape.
Next, heat the thermoplastic material. This can be done using a heat gun or by immersing it in hot water. Follow the manufacturer's instructions for heating, as different types of thermoplastic may require different temperatures and times. Once the material becomes pliable, carefully remove it from the heat source and place it on a flat surface.
Now, it's time to mold the thermoplastic material to fit the patient's thumb. Gently press the heated material around the thumb, ensuring that it provides support to the injured area. Use your hands or a tool to shape the material as needed. Be careful not to apply too much pressure, as it may cause discomfort or hinder blood circulation.
After molding the splint, allow it to cool and harden. This usually takes a few minutes, but again, refer to the manufacturer's instructions for specific guidelines. Once the splint has cooled down, check its fit and make any necessary adjustments.
To enhance comfort and cushioning, add padding material to the inside of the splint. Cut a piece of foam or cotton to fit the interior and secure it in place using medical tape or adhesive. This will provide additional support and prevent any discomfort caused by direct contact with the thermoplastic material.
Remember to clean the splint regularly to maintain hygiene. You can use mild soap and water to wash it gently, ensuring that it is completely dry before reapplying it to the thumb.
Caring for and maintaining the thermoplastic thumb splint is crucial for ensuring its longevity and effectiveness in providing support and stability to the thumb. The thermoplastic splint is a versatile and durable orthopedic device that is commonly used to treat thumb injuries, such as sprains, strains, and fractures. Proper care and maintenance of the splint not only extend its lifespan but also promote better hygiene and prevent potential complications.
To begin with, it is important to regularly clean the thermoplastic splint to remove any dirt, sweat, or bacteria that may accumulate on its surface. A gentle soap and water solution can be used to clean the splint, ensuring that all areas, including the crevices, are thoroughly washed. It is advisable to use a soft cloth or sponge to prevent any damage to the splint's surface. After cleaning, ensure that the splint is completely dry before wearing it again.
In addition to regular cleaning, it is essential to inspect the thermoplastic splint for any signs of wear or damage. Check for cracks, tears, or deformities that may compromise the splint's structural integrity. If any such issues are detected, it is recommended to consult a healthcare professional or the manufacturer for repair or replacement options. Ignoring damaged splints can lead to inadequate support and potentially worsen the thumb injury.
Proper fitting of the thermoplastic splint is another critical aspect of its care. Ensure that the splint is correctly positioned and snugly secured on the thumb. A loose or improperly fitted splint may not provide the necessary support, while a tight splint can cause discomfort and restrict blood circulation. Regularly check the fit of the splint and make adjustments as needed to maintain optimal support and comfort.
Furthermore, it is important to follow any specific instructions provided by the healthcare professional or manufacturer regarding the usage of the thermoplastic splint. These instructions may include guidelines on the duration of wear, activities to avoid while wearing the splint, and any additional care instructions specific to the individual's condition. Adhering to these instructions will ensure the best possible outcome in terms of healing and recovery.
Creating a thermoplastic thumb splint can be a straightforward process by following step-by-step guidelines. By customizing the splint to fit the patient's thumb and providing necessary support, individuals can find relief from thumb injuries or pain. It is important to consult a healthcare professional for a proper diagnosis and guidance on using the splint effectively. Caring for and maintaining the thermoplastic thumb splint is crucial for its effectiveness and durability. Regular cleaning, inspection for damage, proper fitting, and following instructions are vital aspects of maintaining the splint's functionality. By taking these steps, individuals can ensure that their thumb injuries are properly supported and protected for a swift and successful recovery.
 English
 简体中文
简体中文